Saturday, December 2, 2023

Mocking with AWS SDK for Go V2

I have been playing around with the AWS SDK for Go V2 recently. And I was reading their Developer Guide for Testing, and was a little shocked that I had to mock every AWS API that I intended to use.

For many applications this isn't horrible, but it does require adding a lot of abstraction which kinda only makes sense if you are building for multi-cloud already. For many small projects, that isn't worth the upfront cost.

Smithy

Smithy is an interface definition language. It isn't focused on the wire format. Instead it focuses on the shapes and traits of an API. It sounds very academic, but it makes sense in practice.

AWS uses Smithy to define the API concepts and then generate clients for different languages from there. There was a good Hacker News post on the topic a few years ago.

One of the nice things that Smithy brings to the AWS SDK is the ability to manipulate the request/response pipeline to do some interesting things. In this post I'm going to use it to add mocking to existing AWS SDK APIs.

Smithy-go Middleware

Smithy-go has a Middleware concept that it uses to perform all of the necessary transformations from Golang SDK objects into the wire format used by the AWS APIs. I found this diagram to be an easy way to digest the different stages of the middleware.
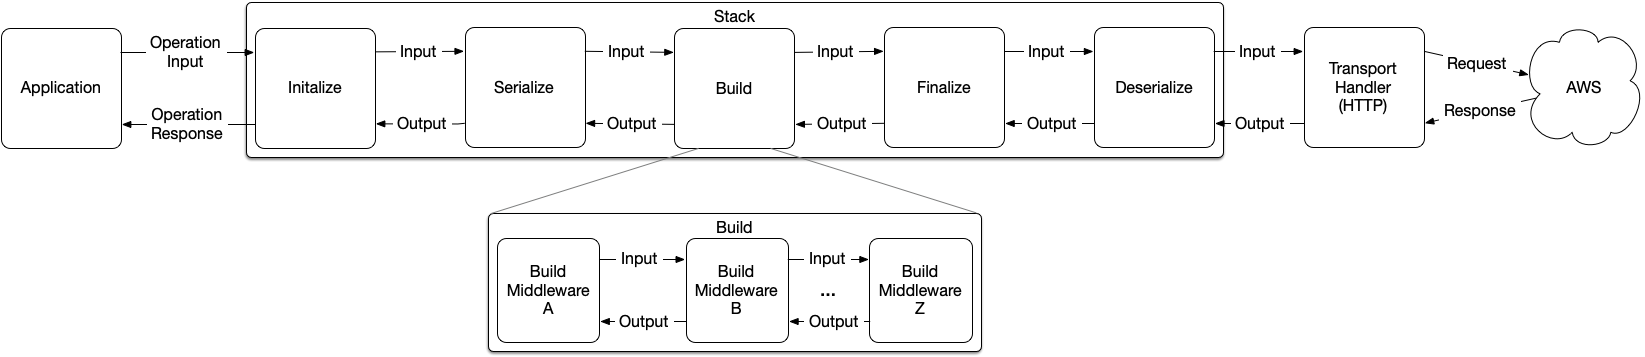
logical diagram of Smithy-go middleware stages.

For the purposes of adding mocking and avoiding actual calls to AWS, I decided to hook into the Initialize stack step.

InitializeMiddleware is Initializing Middleware

Making a middleware that executes a custom function and short-circuits the call to AWS is relatively trivial:

// MockingStackValue is the collection of values to return instead of executing
// the called service.
type MockingStackValue struct {
    Output   interface{}
    Metadata middleware.Metadata
    Error    error
}

// MockingMiddleware implements initiatlize and finalize middleware stages. It
// executes `Test` at at the end of the Initialize Stage to influence what is
// returned at the end of the finalize stage.
//
// See github.com/aws/smithy-go/middleware for more details on the stages.
type MockingMiddleware struct {
    Name string
    Test func(interface{}) (bool, MockingStackValue)
}

// ID returns the Name field.
//
// ID is required by the Middleware interfaces.
func (mocker *MockingMiddleware) ID() string { return mocker.Name }

// HandleInitialize runs the test function to configure how the middleware will
// handle the Finialize stage.
//
// HandleInitialize is required by the InitializeMiddleware interface.
func (mocker *MockingMiddleware) HandleInitialize(
    ctx context.Context,
    in middleware.InitializeInput,
    next middleware.InitializeHandler,
) (middleware.InitializeOutput, middleware.Metadata, error) {
    if passed, out := mocker.Test(in.Parameters); passed {
        return middleware.InitializeOutput{
            Result: out.Output,
        }, out.Metadata, out.Error
    }
    return next.HandleInitialize(ctx, in)
}

MockingStackValue isn't required, but I wanted it to simplify the signature of the Test function. The MockingMiddleware type wraps the Test function in way that allows it to make a decision to short-circuit the AWS call. The Method ID() just required by the InitializeMiddleware interface. As is HandleInitialize().

The simplest way to leverage this middle ware is to add the mocking object to the Config object. This ensures that the mocking object has an opportunity to intercept all AWS calls:

    ctx := context.TODO()
    cfg, err := config.LoadDefaultConfig(
        ctx,
        func(opts *config.LoadOptions) error {
            mocker := MockingMiddleware{
                Name: "dynamodb-mocker",
                Test: mockDDBResult,
            }
            opts.APIOptions = append(opts.APIOptions, func(stack *middleware.Stack) error {
                return stack.Initialize.Add(mocker, middleware.After)
            })
        },
    )
    if err != nil {
        log.Fatalf("Unable to configure AWS client %v", cfg)
    }

There is a lot of AWS/Smithy boilerplate there, but the main idea is that the mocking object is passed in as a configuration option function. If you prefer to add the configuration steps outside of the configuration load, you can follow the guidance in the AWS documentation.

In my application, I implemented something that allows for attaching steps per API call. The App is a lambda, so there isn't a lot of depth to the application, which makes updating the calls to pass the option functions easier:

type AppContext struct {
    AwsConfig config.Config
    Ddb       *dynamodb.Client
    DdbOptFns []func(*dynamodb.Options)
}

func NewAppContext(ctx context.Context) AppContext {
    cfg, err := config.LoadDefaultConfig(ctx)
    if err != nil {
        log.Fatalf("Unable to configure AWS client %v", cfg)
    }
    return AppContext{
        AwsConfig: cfg,
        Ddb:       dynamodb.NewFromConfig(cfg),
    }
}

func (app AppContext) BusinessLogic(
    ctx context.Context,
    request events.APIGatewayProxyRequest,
) (events.APIGatewayProxyResponse, error) {
    ...
    result, err := app.Ddb.Query(ctx, &queryIn, app.DdbOptFns...)
    if err != nil {
        return events.APIGatewayProxyResponse{}, err
    }
    ...
}

func TestHandler(t *testing.T) {
    ctx := context.TODO()
    app := NewAppContext(ctx)
    app.DdbOptFns = []func(*dynamodb.Options){
        func(opts *dynamodb.Options) {
            mm := &MockingMiddleware{
                Name: "customer-query",
                Test: mockCustomerQuery,
            }

            opts.APIOptions = append(opts.APIOptions, func(stack *middleware.Stack) error {
                return stack.Initialize.Add(mm, middleware.After)
            })
        },
    }
    ...
    response, err := app.TimelineHandler(ctx, request)
}

I don't particularly like that app.DdbOptFns... hanging off the end of the call like that. I'll probably spend some time seeing if I can make it disappear without having to wrap every single client.

I prefer this approach as it allows me finer control over which API calls get mocked and which are treated more like an integration test.

Other Thoughts

Another approach I might investigate is making the decision to mock at the Initialize stage of the stack, and then changing the result at a different stage of the stack. One example of doing this would be to fake the wire protocol response in Deserialize stage. The advantage of manipulating the mock in this was is to preserve most of the expectations on what the AWS SDK normally does, in terms of authentication, etc. The AWS SDK has details for how to pass the metadata towards AWS.

I'm starting to like the "shape" approach used by smithy for defining APIs. It could be interesting to see what the effort is to implement my APIs in Smithy and generate the clients. We have a lot of conversations at Datadog about Services, Resources and Operations, and the bullet points in the Smithy Quickstart have given me some new perspective on those topics.

Friday, December 10, 2021

A New Vulkan-Go Bridge

I got frustrated with the state of the vulkan-go bridge. Mostly that it was seemingly unsupported. Additionally, the c-for-go library made everything difficult to update. As a result, I spent a week and wrote my own vulkan bindings generator.

Monday, November 1, 2021

Vulcan, Go, and A Triangle, Part 11 bis

In part 10, I mentioned trying to use go routines to create the command buffers, but that didn't work because the command pool and the command buffers must all be operated on in a single thread.

I had tried doing the command recording in parallel using go-routines, but that resulted validation layer threading errors. A command pool is apparently thread specific.

The rest of this part explores using a locked thread go routine associated with a command pool in order to multi-thread command recording.

Note This is basically building an abstraction layer on top of Vulkan, and isn't necessary to understand how vulkan works. As this code is a wholesale divergence from the Vulkan tutorial, I won't be using it when I start on the next section.

Saturday, October 30, 2021

Vulcan, Go, and A Triangle, Part 11

In this part, I used the previous created semaphores and fences to coordinate rendering and presentation. I also implement resizing of the window.

This part follows along with Drawing a triangle / Drawing / Rendering and presentation / Acquiring an image from the swap chain through to the end of Drawing a triangle / Swap chain recreation.

Thursday, October 28, 2021

Vulcan, Go, and A Triangle, Part 10

In this part, I created the command pool, the command buffers, and recorded the rendering to our framebuffers.

This part is a direct translation of Drawing a triangle / Drawing / Command buffers.

Tuesday, October 26, 2021

Vulcan, Go, and A Triangle, Part 9

In this part, I made the pipeline objects. This includes loading the shader modules, configuring the fixed functions, and creating the Vulkan pipelines. This part started with Drawing a triangle / Graphics pipeline basics / Shader modules, jumps into the Fixed functions, and ends with the Conclusion.

Sunday, October 24, 2021

Vulcan, Go, and A Triangle, Part 8

In this part, I made the image views, render pass, framebuffers and pipeline layout. All things that only modify the pipeline file. I found Drawing a triangle / Graphics pipeline basics / Introduction an excellent reminder about computer graphics in general and useful for understanding vulkan in particular.

This part doesn't relate to a single section in the Vulkan tutorial; it jumps around between a couple of different sections that were all pipeline specific and would need to be recreated if the pipeline needed to be recreated. It also references the Vulkan Tutorial almost constantly, as I didn't want to plagiarize their excellent explanations of these concepts.

Friday, October 22, 2021

Vulcan, Go, and A Triangle, Part 7

In this part, I am going to add the the swapchain. My application will eventually take one of these swap chain images and draw to it, but that will be closer to the end of this tutorial.

This part follows closely with Drawing a triangle / Presentation / Image Views. I've opted to keep swapchain a single word, regardless of my spell checker; this is mostly because Vulkan treats it as one word in the API. So expect to see Swapchain where the Vulkan Tutorial would have written SwapChain.

Wednesday, October 20, 2021

Vulcan, Go, and A Triangle, Part 6

In this part we are going to add support for required device layers and extensions before creating a logical device. The logical device creation process is similar to the instance creation process. Instead of telling Vulkan about our application, we will be telling Vulkan about our device requirements.

This part follows closely with the Vulkan Tutorial. I do push the required extensions checks into the device selection function, but otherwise the steps are similar to Drawing a triangle / Setup / Logical device and queues.

Monday, October 18, 2021

Vulcan, Go, and A Triangle, Part 5

In this part I am going to create an object for keeping track of our physical device, enumerate over physical devices, and select a physical device for our application.

I deviate from the vulkan tutorial here a little bit because I wanted to encapsulate physical device related functionality in a specific class. This will become more useful later when dealing with memory buffers. I also create the surface in a different order.

This part relates to Drawing a triangle / Setup / Physical devices and queue families in the original tutorial.

Sunday, October 17, 2021

Vulcan, Go, and A Triangle, Part 4

In this part of the tutorial, I'm going to inspect what extensions and layers are available for an instance. The call to vk.CreateInstance can result in vk.ErrorLayerNotPresent or vk.ErrorExtensionNotPresent according to the Vulkan spec. By inspecting the available options and checking if my required options are supported, I can provide a more debuggable error response.

Following the Vulkan Tutorial, I implemented the necessary functions to enumerate over available layers and extensions before calling CreateInstance. This part relates to Drawing a triangle / Setup / Instance / Checking for extension support in the original tutorial.

Saturday, October 16, 2021

Vulcan, Go, and A Triangle, Part 3

In this part of the tutorial, we are going to initialize a vulkan instance. The vulkan instance is the connection between your application and the Vulkan framework. It allows the application to enumerate physical devices and supported functionality.

This part relates to Drawing a triangle / Setup / Instance in the original tutorial.

Vulcan, Go, and A Triangle, Part 2

In the last part, we started with adding dependencies, helper functions and the basic skeleton. In this part we are going to start expanding on setup()cleanup(), and mainLoop().

Each part going forward will end with code that should build and run, although in many cases there will not be a visible output.

Part 2 roughly translates to the second half of Drawing a triangle / Setup / Base code.

Vulcan, Go, and A Triangle, Part 1

This tutorial follows my personal execution of the Vulkan tutorial, with the distinction of being in Go instead of C++.

I started this effort because Go is my preferred programming language and I was interested in understanding more about the modern landscape of GPU programing. While I was able to find a Vulkan tutorial translated for Rust, I could not find an existing one for Go.

While my exploration of Vulkan follows the general approach of the Vulkan Tutorial, I have done certain steps out of order and try to leverage Go idioms where I can. I also tried to write the code so that most steps start with pseudo-code comments which eventually get expanded into code-blocks.

Tuesday, August 2, 2016

Knapsack and Go

I've been playing around with Go a lot the past year. I've done a couple of projects for pay, and a couple of projects for fun. I have been finding it an incredibly useful pocket language for solving almost any problem.

Recently, I spent some time researching the different solutions to the knapsack problem. After reading all about the knapsack problem on wikipedia, I implemented the bounded solutions in go. As a control, I used the item list for Nils Haldenwang's post about Genetic Algorithm vs. 0-1-KNAPSACK.

I started off with a recursive brute force approach, and kept evolving that approach until I had an iterative solution that used a channel for generating the set of combinations. It probably isn't the most efficient way to implement the set generation, but I still tend to throw channels and goroutines at any generator I see in code.

After I had the brute force approach, I optimized it a little bit by trimming out branches that would never be used. This resulted in about half the time required for the same dataset. But it actually doesn't change the worst case scenario much. It isn't so much of a solution as an optimization that makes it look a little more breadth first search. These ran in about 17 seconds for brute force, and 12 seconds for the optimized version.

Then I implemented the dynamic programming approach, which is just unbeatable speed wise. Didn't even register as a millisecond for the testing dataset. It took me a little bit to understand how to discover the list of items packed in the knapsack, but the total solution was still small enough to understand. I used Mike's Coderama to help me understand what was going on there.

Finally, I implemented the meet in the middle solution. This was actually a surprisingly faster solution than I expected. The code was able to reuse the parts I had done for the brute force solution, which made it fast to write. The simple solution was able to solve the 24 item problem in about 100ms. I played around with it a bit to optimize the best-case scenarios, and got it to about 40ms on average.

In the end, I like the meet in the middle solution the best. It is feasible to use the solution for all types of bounded knapsack problems where you have to use a float for the weight. I posted my go implementation of the bounded knapsack problem on gist.

Now, its time to play with the bin packing problem.

Tuesday, March 3, 2015

WatSON Composite Ingredients

Simple ingredients represent a single value, like a number or a string. My last post covered the basic details for simple ingredients. Composite ingredients are designed to contain other ingredients or multiple values. Some are used to change how things are written to the file, like the Compressed Ingredient. Others are designed to provide structure to the file like the Container and Map Ingredients.

For simplicity, I am listing only the 8-bit sizes for the Ingredients, but the structure is valid for any size type.

Byte Reduction Ingredients


The library and compressed ingredients are designed to reduce the number of bytes required by data stored in WatSON format.

Library ingredients contain strings that are used elsewhere in the document. This primarily applies to keys for the map ingredient, but also applies to bytes ingredients. Libraries use a zero based index (the first element is index zero), but the string at index zero is always an empty string. The empty string is because the index zero is reserved.. See the map and byte ingredients for more details.

Library scope is going to be mentioned in the description for byte and map ingredients. Right now I am defining that as the nearest library in a parent container, although scope should get its own dedicated post in the future.

<library-ingredient> ::= ‘L’ <8-bit-size> <empty-string-ingredient> <string-ingredient>*

Compressed ingredients contain a single ingredient that has been compressed. I toyed around with the idea of making them a container as well, but I felt the single ingredient child would make implementations more straightforward at the cost of a few extra bytes.

I am thinking of using Snappy for the compression method. I haven't decided how flexible that will be in the future.

<compressed-ingredient> ::= ‘Z’ <8-bit-size> <data>*

Structure Ingredients


Container and map ingredients are designed for nesting and providing structure a WatSON document.

A container contains other ingredients. It is used for nesting and grouping ingredients. Think of it as a vector or list. Nothing inside a WatSON document references positions in a container. Order will probably be important. especially with regard to library and header ingredients. 

<container-ingredient> ::= ‘C’ <8-bit-size> <ingredient>*

A map ingredient is a key value structure. The keys are 32 bit unsigned integers. Positive keys reference the in scope library. A key of zero is reserved for an empty string key. I think I will be using that key as optional metadata, but I haven’t thought through what and how that metadata will be used. That will probably get a dedicated post in the future.

<map-ingredient> ::= ‘M’ <8-bit-size> <map-data>*
<map-data> ::= <uint32> <ingredient>

Extension Ingredients


Binary and header ingredients change how a parser should interpret WatSON data that follows.

Binary ingredients store opaque binary data. A positive marshal hint is a reference into the in scope library. A marshal hint of zero is reserved for an undefined marshal hint. I am thinking of the marshal hint as a place to store the run-time type. WatSON doesn’t specify anything about the data.

<bytes-ingredient> ::= ‘B’ <8-bit-size> <marshall-hint> <data>*

Headers are string based maps that contain information about the file contents. They are optional ingredients, and used to document requirements for parsing the rest of the file. An example would be the character encoding for strings, although I am leaning towards utf-8 being mandatory. They can also be used to document schema information or metadata like the program that generated the file, etc.

<header-ingredient> ::= ‘H’ <size> <header-data>*
<header-data> ::= <c-string> <ingredient>

I like how the format is coming together. I have my incomplete reference implementation foundation, as rough as it is, checked in on github.

Thursday, February 26, 2015

WatSON Data Types.

In my last post, I mentioned what I was calling the type marker:

<Type-marker> ::= <size-type> <data-type>

Size
Type
Data
Type
b7 b6 b5 b4 b3 b2 b1 b0

That post was dedicated to the highest 2 bits of the Type-Marker; the two bits that represent the size-type. This post is dedicated to the lower 6 bits: the data type. An MP4 atom uses 4 bytes to represent the data type (atom name). The size makes sense given the large, dynamic ecosystem that the specification is trying to support. Interestingly, the convention is not to describe the atom names as 4 byte integers. They are almost always referred to by their ascii representation. For example, the "Movie" atom is "\x6D\x6F\x6F\x76", which, if treated as a character string is "moov" (pronounced "Moo-V").

I like the idea of numeric identifiers having useful printed representations, so I copied that concept into the type markers for WatSON. For example, the single byte types of null, false, and true will be represented as the following:

<empty-false-type> ::= '0' ;; st == 00, dt == 110000
<empty-true-type> ::= '1' ;; st == 00, dt == 110001
<empty-null-type> ::= '?' ;; st == 00, dt == 111111

This manages to combined the size type and the data type into single character type marker that matches the convention for the type. This only holds true in the most common representation. Someone could create a short false type with an 8-bit length, similar to the following.

<short-false-type> ::= 'p' ;; st == 01, dt == 110000

The character 'p' doesn't represent false for me, but I see no reason to create rules preventing that ingredient. Using 2 bytes to store false is a waste of space. but it should not break parsing.

Going with this expectation about common sizing, I selected the following values for the lower six bits:

<simple-data-type> ::= 0x30 ;; False type
  | 0x31 ;; True type
  | 0x3F ;; Null type
  | 0x24 ;; Float type
  | 0x29 ;; 32-bit signed integer type
  | 0x2C ;; 64-bit signed integer type
  | 0x35 ;; 64-bit unsigned integer type
  | 0x22 ;; Bit-flags type
  | 0x33 ;; String type
  | 0x08 ;; Header type
  | 0x0C ;; Library type
  | 0x03 ;; Container type
  | 0x1A ;; Compressed container.
  | 0x0D ;; Map type
  | 0x02 ;; User defined binary type

I break them into two categories: empty and short. I’ll start by repeating the empty ingredient types from above:

<false-ingredient> ::= '0'
<true-ingredient> ::= '1'
<null-ingredient> ::= '?'

Then I have the simple short ingredients:

<double-ingredient> ::= ‘f’ ‘\x0A' <8-bytes-data>
<32-bit-int-ingredient> ::= ‘i’ ‘\x06' <4-bytes-data>
<64-bit-int-ingredient> ::= ‘l’ ‘\x0A’ <8-bytes-data>
<64-bit-uint-ingredient> ::= ‘u’ ‘\x0A’ <8-bytes-data>
<bit-flags-ingredient> ::= ‘b’ <8-bit-size> <data>*
<string-ingredient> ::= ’s’ <8-bit-size> <data>*

Last, I have the composite ingredients. I went with short sizes on these, mostly because of the lack of diversity above 127. My hand crafted WatSON documents are all less than 256 bytes, so the short sizing may be biased or flawed.

<header-ingredient> ::= ‘H’ <8-bit-size> <data>*
<library-ingredient> ::= ‘L’ <8-bit-size> <data>*
<container-ingredient> ::= ‘C’ <8-bit-size> <data>*
<compressed-ingredient> ::= ‘Z’ <8-bit-size> <data>*
<map-ingredient> ::= ‘M’ <8-bit-size> <data>*
<bytes-ingredient> ::= ‘B’ <8-bit-size> <data>*

I hope no one ever has to hand craft a file or see the characters, but I like that they make sense in smaller documents. For larger documents, you are probably going to need a tool or program to keep track of structure, so the letters on the composite ingredients are less important..

I think the next post will be focused on the composite ingredients. Specifically the containers.

Friday, February 20, 2015

WatSON Size and Type Specification

In trying to understand where I am going with the WatSON specification, it is useful to have some background on the MP4 file specification. Atomic Parsley provides a mostly easy to digest background on MP4 atoms.

In the first 8 bytes of every atom, you have enough context to either skip over the atom, or dive deeper into the atom. I wanted to create a specification that allowed the same type of flexibility. A specification where the fundamental component of the file format is simple, but easily extensible. I am trying to keep the size of the format down as well, so I wanted to come up with a model that lets me represent types like "true" and "false" in a single byte.

Note, the names used after here are just place holders. I have been more interested in the format concept than naming at this point:

<Ingredient> ::= <Type-Marker> [<Size> <data>*]

Every ingredient starts with a Type-Marker. Type Markers are a single byte with two components. The 6 lowest bits determine the data-type. This would be similar to the atom name in MP4 files. It basically tells the parser what to expect inside the data section.

The highest 2 bits of the Type-Marker represent the size-type. The size type describes how large the Size value will be. MP4 doesn't have a similar concept. Sizes are always 4 bytes long, and special sizes are used to communicate non-standard sizes.

Size
Type
Data
Type
b7b6b5b4b3b2b1b0

The size type is basically a way to help reduce the overhead of smaller ingredients. Smaller types, like numbers, use 8-bit sizes, while larger types like long-strings and big-containers use a 64-size. Here is an example how a string ingredient could use the different size types.

<empty-string> ::= '\x33' ; st bits == 00, dt bits == 110011
<short-string> ::= 's' <8-bit-size> <data>* ; st == 01, dt == 110011
<med-string> ::= '\xB3' <16-bit-size> <data>* ; st == 10, dt == 110011
<long-string> ::= '\xF3' <64-bit-size> <data>* ; st == 11, dt == 110011

The overhead for storing different types is 1 byte, 2 bytes, 3 bytes and 9 bytes. An empty string is represented by a single byte, with no size data following. The other string types have a required size component of various lengths. String data in WatSON will not be null terminated.

For the most common cases, this uses less space than storing a string in bson format, which has a fixed 6 byte overhead (1 for type, 4 for size, 1 for null-terminator). For strings longer than 65k, it has a larger 9 byte overhead, but can also store strings significantly larger than 4 gigabytes.

I haven't decided how I want to flag compression requirements on 64-bit sizes. I was thinking of maybe having the 64-bit size be signed (negative being compressed), or maybe reserving the highest bits for special flags like encryption and compression. Another idea I am toying around with is a "compressed container", such that Ingredients themselves aren't compressed, but they exist in a container that is compressed.

All of this is draft ideas at this point, but I am looking for some feedback.

Thursday, February 19, 2015

Semper Fidelis

Semper Fidelis is a latin phrase that roughly translates to “always faithful”. It is also the Marine Corps motto. When I was 19 and going through bootcamp, I would always ask “faithful to what?” I always received “Corps and country” as the response. Like all mottos that survive for 100 years, it is necessarily vague and open for a lot of interpretation. 

Over the years, I have decided that “faithful” applies to a core set of ideals. Consistency, transparency, respect, and mentoring are the foundation of my “always faithful”. People classify leaders as irresponsible if they can easily identify a scenario where you have betrayed any of those four ideals. Arguably, this is the human nature behind the “shame-ification” of the internet: one thoughtless joke on twitter classifies a person as worthless in every aspect of life. Consistency is that important in our new “social” society.

Shakespeare wrote “to thine own self be true,” and this is the core of being faithful. I start by identifying what I believe and how I want to be perceived. I must understand the consequences I am selecting and own them in good times and bad. I put those decisions on display so that others can see and interpret them, especially the ownership and repercussions. Transparency in decisions and owning the consequences are aspects I want in leaders, and I must demonstrate the behaviors I want.

Being purely true to “thine own self” is problematic. Focusing internally creates an island of isolation. Islands don’t work well on teams, and they make for horrible leaders. Overcoming the island problem requires respecting that others are also trying to find and be true to themselves. Just as I have different experience at 35 than I did at 19, others are learning through their own experience. I nurture my respect for others through mentoring and trying to learn from their experience. I freely share what I have learned from my experiences. Helping others find their own definition of “always faithful”.

I don’t think faithfulness to organizations, projects, or people exists anymore. I view the “Corps and country” answer from boot camp to be naive. Other people, no matter what their role or their previous success are still learning. They all suffer from the same cognitive biases that plague all people and leaders. Ideals are less prone to human basis, and as demonstrated with a phrase like “Semper Fidelis”, they can evolve as the situation changes.

Find what you want to be remembered as, and always be faithful to those ideals.

Friday, February 6, 2015

Something to replace BSON.

I have been working on my own implementation of the BSON Spec for about 3 years now. I have come to the conclusion that the BSON design seems haphazard and organic. The parsing is harder and more intensive than it should be. Scanning it is poorly designed. The specific types require too much knowledge to handle properly. They even continue making small changes to the specification, but not bumping the version number.

In order to solve my problems with it, I have decided to create my own specification and call it WatSON. Well, technically, I am calling it “왓슨”, but I don’t know how to type that on my English (US) keyboard.

Here are some of my design goals.

  • Keys are defined at the start of the document to eliminate repetitive keys.
  • Arrays don’t have keys at all.
  • Types and Objects are connected, rather than being separated by the key name.
  • Containers and strings have 64 bit size markers. Other types have 1 byte size markers. The format must have a simple rule for skipping elements that don’t match a known type.
  • Document format is little-endian.
  • String formats support Snappy compression.
  • Format supports header information to influence how the document is read.

A lot of my influence in the design is coming from dealing with atoms in the MP4 file format. 

For more detail on how things are coming together: